
Controlling the Variables for Perfect Class II Restorations
By David K. Chan DMD, AAACD
Posterior dental composite restorations have become a cornerstone of modern restorative dentistry, combining esthetics, function, and conservation of tooth structure. One of the most critical aspects of achieving a successful posterior composite restoration is the ease of placing a long-lasting sensitivity-free restoration and accurately reproducing the occlusal anatomy for proper function with minimal adjustments. Proper occlusal morphology ensures efficient mastication, harmonious occlusion, and long-term durability of the restoration. Understanding the detailed bonding, restoration placement, and occlusal anatomy of posterior teeth is therefore fundamental for both functional and a successful esthetic outcome.
I believe there are several fundamental criteria for posterior dental composite restorations that must be embraced to achieve an efficient workflow for the dentist and predictable clinical success for the patient. These criteria must encompass biocompatibility, anatomical, functional, and esthetic considerations to ensure long-term performance and patient satisfaction.
ADHESION AND BONDING PROTOCOL:
An effective adhesive system is vital for retention and marginal seal. The bonding protocol should follow manufacturer instructions precisely, including:
- Etching (total etch or selective enamel etch technique).
- A universal adhesive system with selective etch or total etch technique can be chosen based on clinical needs and operator preference.
- Priming and adhesive application in a thin, even layer, and scrubbing for 20 seconds with a microbrush to agitate the bonding agent.
- Use sufficient gentle air drying to remove all solvent, careful not to over air thin the adhesive.
- Proper curing to ensure complete polymerization.
MARGINAL INTEGRITY:
A well-sealed margin prevents microleakage, marginal discoloration, and secondary caries. Not all materials or techniques can achieve this outcome.
PROXIMAL CONTACT AND CONTOUR:
Proper use of a sectional matrix system (e.g. DualForce™ Sectional Matrix System, Clinician’s Choice®) ensures tight and anatomically correct proximal contacts. Proximal and occlusal embrasures should allow for self-cleansing by the tongue and gingival embrasures that are anatomically shaped to prevent food impaction and periodontal irritation.
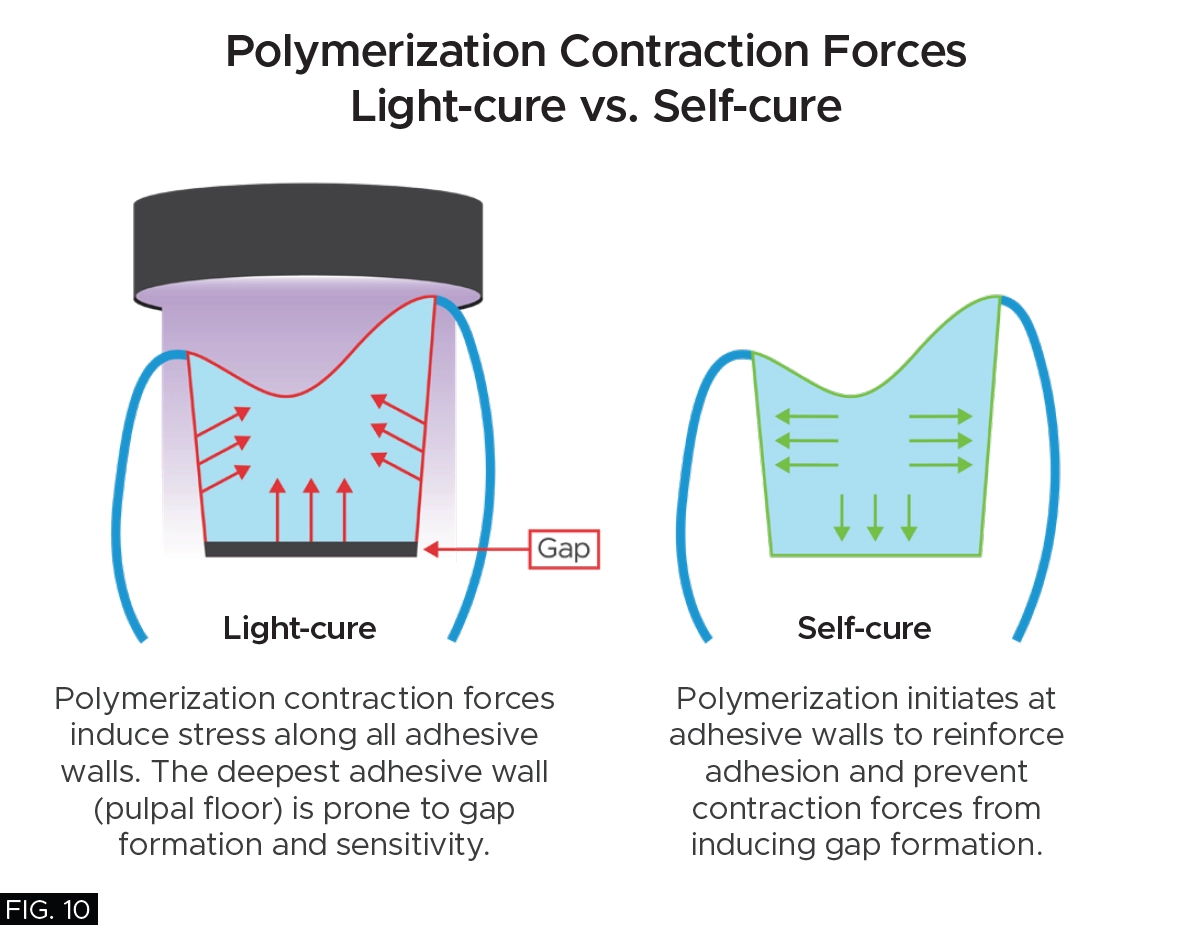
POLYMERIZATION SHRINKAGE AND CURING:
Excessive composite polymerization shrinkage stress can lead to increased risk of post-operative sensitivity and future recurrent caries. Inadequate light-curing in deep composite restorations can lead to weak, under-polymerized material and also lead to potential post-operative sensitivity.
IMPORTANCE OF OCCLUSAL ANATOMY IN POSTERIOR COMPOSITES:
The occlusal surface of posterior teeth is designed to grind food efficiently while maintaining balanced contact with opposing teeth. When restoring posterior teeth with composite resin, the clinician must recreate the intricate topography of cusps, grooves, fossae, and ridges. Poorly defined occlusal anatomy can lead to occlusal disharmony, food impaction, patient discomfort, and premature wear or failure of the restoration. Conversely, well-sculpted occlusal anatomy enhances function, provides a natural appearance, and distributes occlusal forces evenly across the tooth.
KEY COMPONENTS OF POSTERIOR OCCLUSAL ANATOMY:
- Cusps: Elevated points that participate in mastication.
- Fossae: Depressions between cusps that receive the opposing cusps during occlusion.
- Ridges: Linear elevations such as the marginal ridges, triangular ridges, and transverse ridges that define cusp inclines and contribute to tooth strength.
- Grooves and Pits: Developmental lines that separate cusps and direct food flow during mastication.
In this article, a description along with a detailed map will be provided on how to accurately sculpt the occlusal anatomy of posterior teeth.
FINISHING AND POLISHING:
Finishing involves refining anatomy and removing excess material; polishing provides a smooth, glossy surface that resists plaque accumulation and staining. A systematic approach using progressively finer abrasives ensures long-lasting luster and patient comfort.
ESTHETIC EVALUATION:
Natural shade blending, translucency, and surface gloss are essential for matching the adjacent enamel boundaries. In almost all cases, it is the proper opacity of the composite resin which makes the restoration simply blend in and disappear with the native tooth structure.
CLINICAL CASE REVIEW
A young female physician presented to my office with a chief complaint of sensitivity to cold and sweets in her lower right dentition which has been persistent for approximately 1 month. Upon clinical and radiographic examination, it was determined that her lower right first premolar #28 (#44) had a previous restoration that had fractured and was compromised by recurrent caries. (FIG. 1)
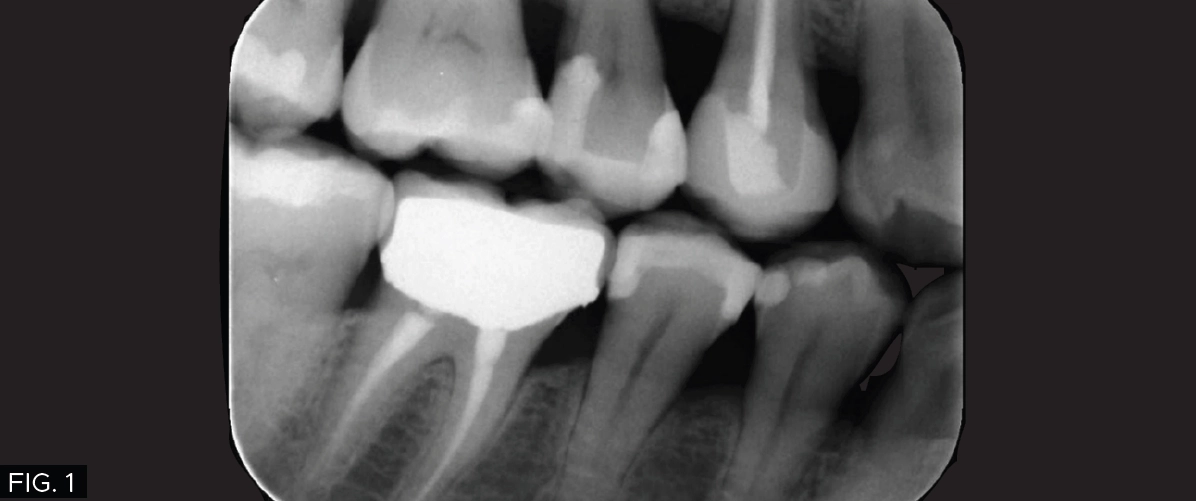
Radiographic image showing the carious lesion in the lower right first molar #28 (#44).
The carious lesion was rather deep into the tooth according to the radiographic image but not wide. The carious lesion was less than ½ the distance between the buccal/lingual cusp distance making this an excellent case for a direct composite restoration. (FIG. 2)
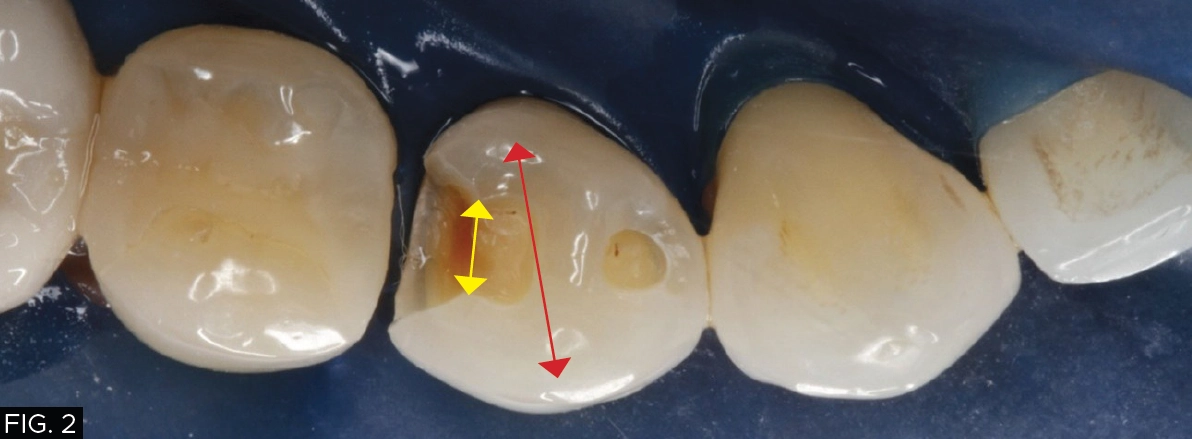
Carious lesion measuring less than half the distance between the buccal/lingual cusp.
Tooth #28 (#44) was diagnosed with a fractured DO composite restoration with recurrent caries and a mesial fossa with caries. It was determined that a minimally invasive restoration, using a direct composite DO and a separate occlusal restoration in the mesial fossa were required.
The direct composite material chosen was Evanesce® Bulk Cure™ from Clinician’s Choice due to the following unique features of this restorative composite resin:
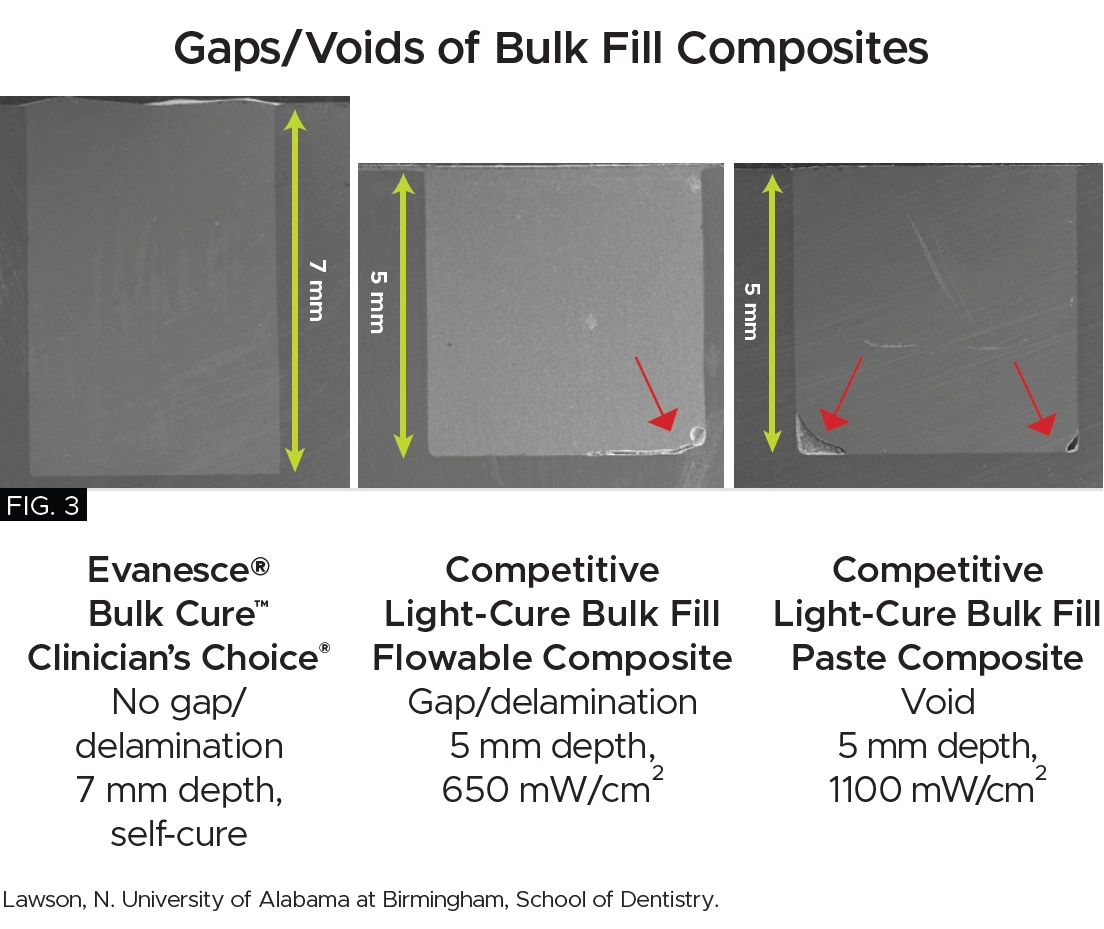
- Bio-Adaptive™ Restorative Performance: The flow characteristics of Evanesce Bulk Cure ensure gap-free margins with all bonding techniques, promoting optimal sealing of both dentin and enamel to enhance marginal integrity, minimizing the risk of microleakage. (FIG. 3) Evanesce Bulk Cure will easily adapt to irregular line angles or preparation variables. Both placement and shrinkage voids are consistently prevented at the proximal box, a common challenge with all light-cure composites.
- Unlimited Depth of Cure and Low Shrinkage Stress: Dual-cure Evanesce Bulk Cure provides an unlimited depth of cure, even when light access is restricted. Its low polymerization shrinkage stress helps to prevent post-operative sensitivity, and gap formation.
- Fast and Versatile: Evanesce Bulk Cure can be applied in a single increment or capped with a paste composite resin, regardless of cavity depth. Its quick placement and cure time of just 60 seconds offers significant time savings compared to traditional multi-increment techniques.
- Superior Aesthetics: Evanesce Bulk Cure comes in three VITA shades (A1, A2, A3) which will match the vast majority of natural tooth shades. In addition, the opacity of this composite allows it to virtually blend into the remaining tooth structure.
On the day of the treatment appointment, the patient was anesthetized and a rubber dam was placed in the right mandibular quadrant.
A DO preparation and a separate occlusal preparation were made in tooth #28 (#44). Due to the depth of the caries in close proximity to the pulp, only the infected dentin was removed, as leaving the affected dentin in place aligns with minimally invasive dentistry. Numerous peer reviewed studies have shown the affected dentin will re-mineralize over time on its own.¹ (FIG. 4)

A DO preparation and occlusal preparation was made in tooth #28 (#44). Only the infected dentin was removed.
The preparation was cleaned with an air abrasion unit (PrepStart™, Zest Dental Solutions®) to remove any debris and rinsed with an air/water syringe for a few seconds to remove the aluminum oxide powder. A selective etching technique of the enamel for 15 seconds was achieved using 35% phosphoric acid (such as Max Etch, Clinician’s Choice or Ultra-Etch™, Ultradent™ Products, Inc.) followed by rinsing and light drying of the tooth, leaving the dentin moist.
The bonding agent, MPa Universal™ (Clinician’s Choice), a one-step bonding agent, was applied with a microbrush for 20 seconds with constant agitation over the entire preparation. This was followed by 10 seconds of air thinning to evaporate the solvent or until the bonding agent does not move under the air stream. The bonding agent was then light polymerized with a LED curing light for 10 seconds.
A 4.5 mm DualForce™ Ultra-Wrap™ Sectional Matrix Band (Clinician’s Choice) was chosen and inserted on the distal side of tooth #28 (#44) and the band was sealed along the gingival margin with a #4 DualForce™ Active-Wedge™ (Clinician’s Choice). The matrix band was then secured in place with a pre-molar DualForce Matrix Ring (Clinician’s Choice) adapting the sectional matrix band to the tooth and providing the separation force necessary for a tight contact. (FIG. 5)
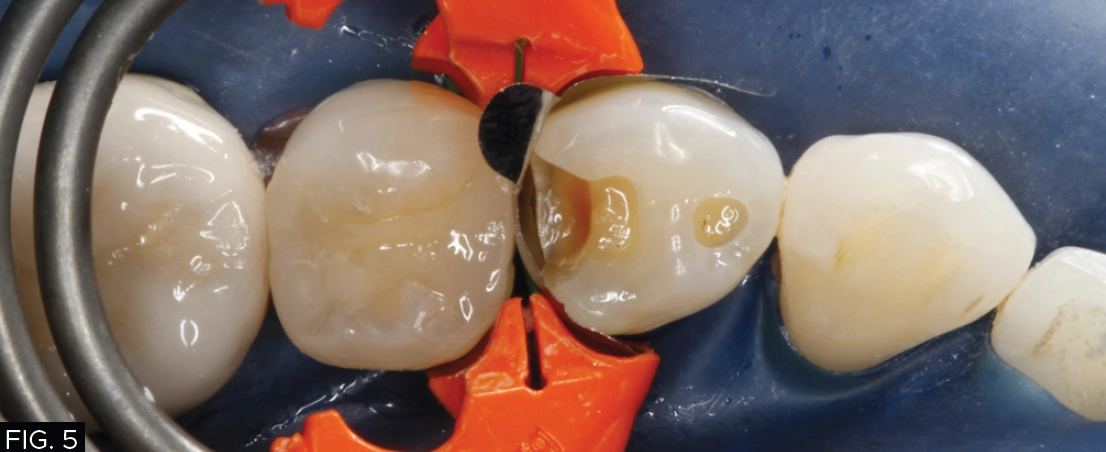
DualForce Ultra-Wrap Matrix Band, Active Wedge, and Molar Ring were placed allowing for proper adaptation and provide necessary separation force.
The DualForce Ultra-Wrap matrix band also creates the proper proximal tooth anatomy as well as the proper occlusal embrasure anatomy, while the Active-Wedge seals the proximal box.
(FIG. 6, 7)
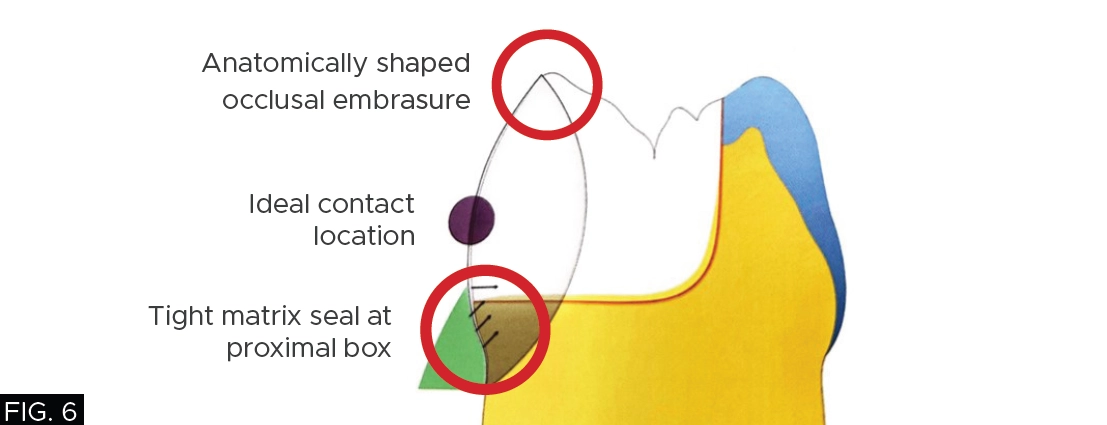
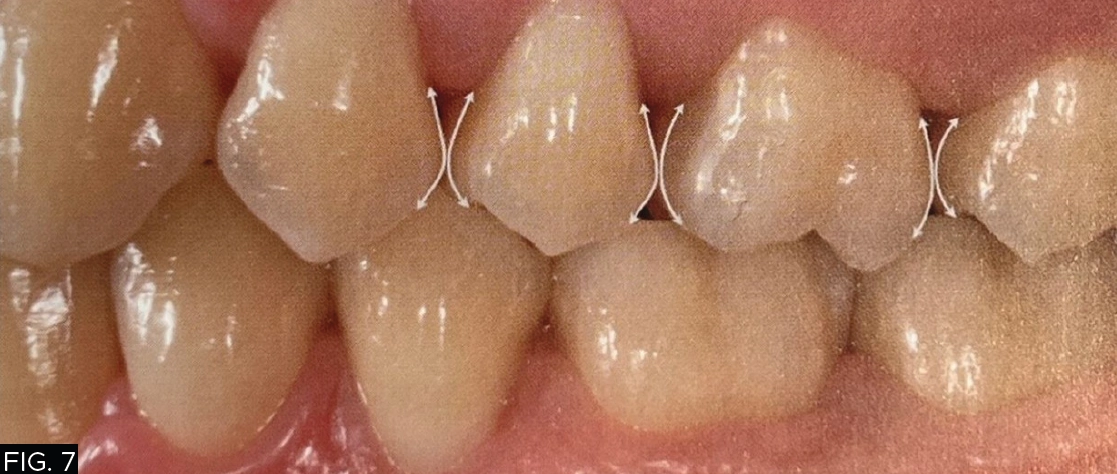
Proper proximal tooth anatomy.
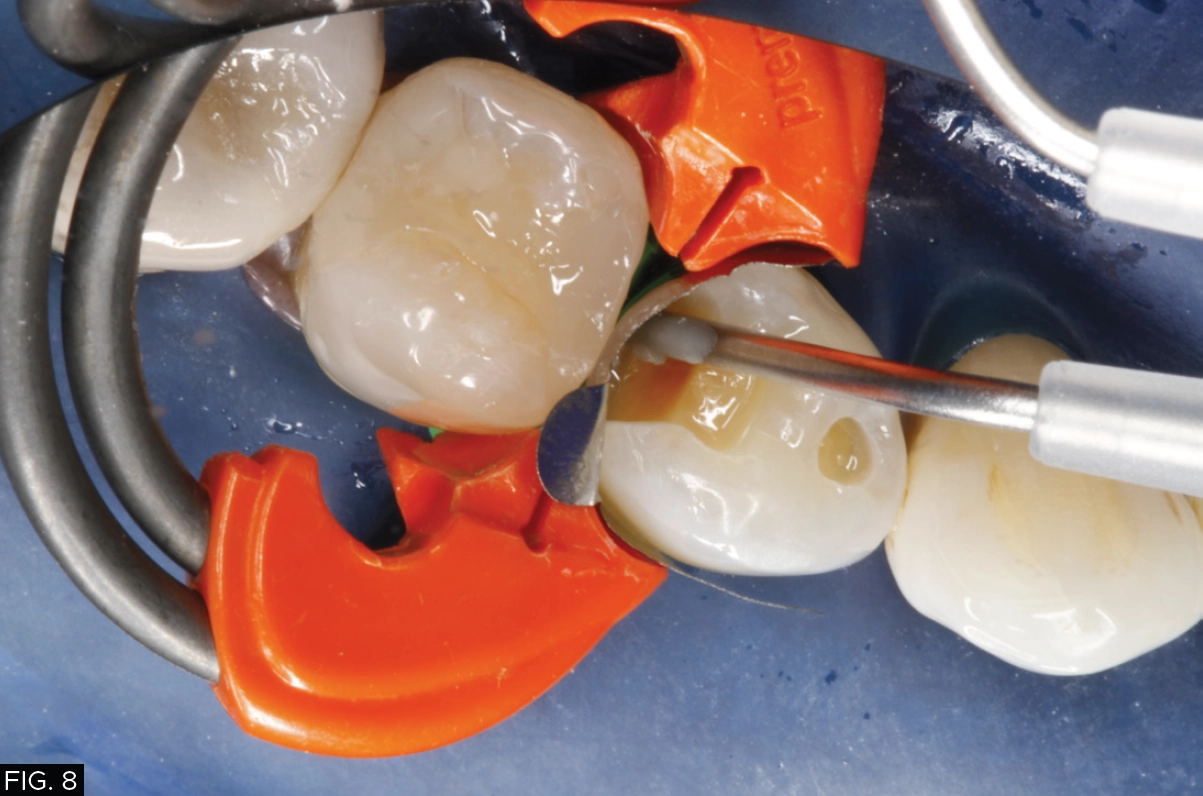
The secured sectional matrix was then adapted to the adjacent tooth by the aid of the round end of a Multi-Use Composite Instrument (Cosmedent®). (FIG. 8)
Light-curing can be done without risk of inducing sensitivity because the DO wall is built all within enamel.
A thin layer of my restorative material of choice, Evanesce Bulk Cure in shade A2 (Clinician’s Choice) was used to build up the distal proximal wall. The canula was used to move the material from the gingival floor up the sectional matrix and light-cured for initial polymerization thereby turning this restoration into a Class I occlusal restoration. I routinely turn all my Class II restorations into Class I preparations so that I can remove the rings and matrix bands, allowing me to focus on the proper occlusal anatomy without interference. (FIG. 9)
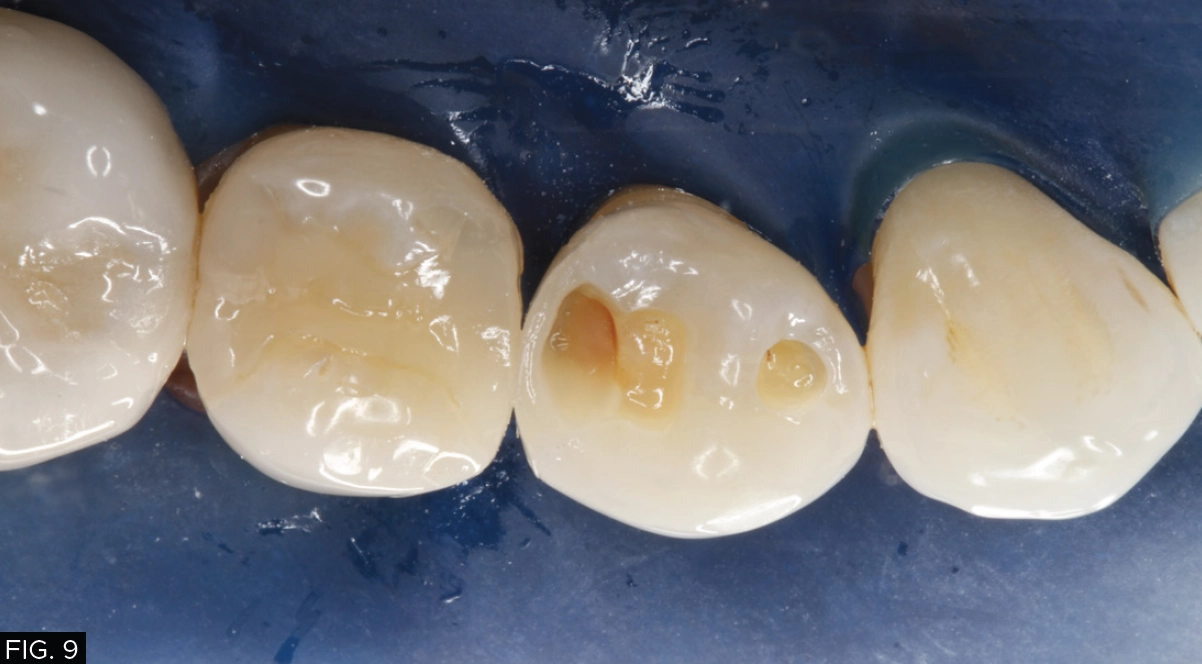
Ring and sectional matrix are removed, turning this case from a Class II to a Class I. Evanesce Bulk Cure is then used again to restore the remaining Class I preparation.
Once the ring and sectional matrix are removed, additional Evanesce Bulk Cure composite was used to restore the remaining Class I preparation. Due to the “bio-adaptive” nature of Evanesce Bulk Cure, it allows for the bulk filling of essentially the entire occlusal preparation in one large increment of composite with virtually zero voids on the margins or pulpal floor. In addition, Evanesce Bulk Cure is a dual-cure composite which provides an unlimited depth of cure, even when light access is diminished due to deep restorations. When allowed to self-cure for 30-60 seconds after placement, its low polymerization shrinkage stress also helps to prevent post-operative sensitivity. (FIG.10)
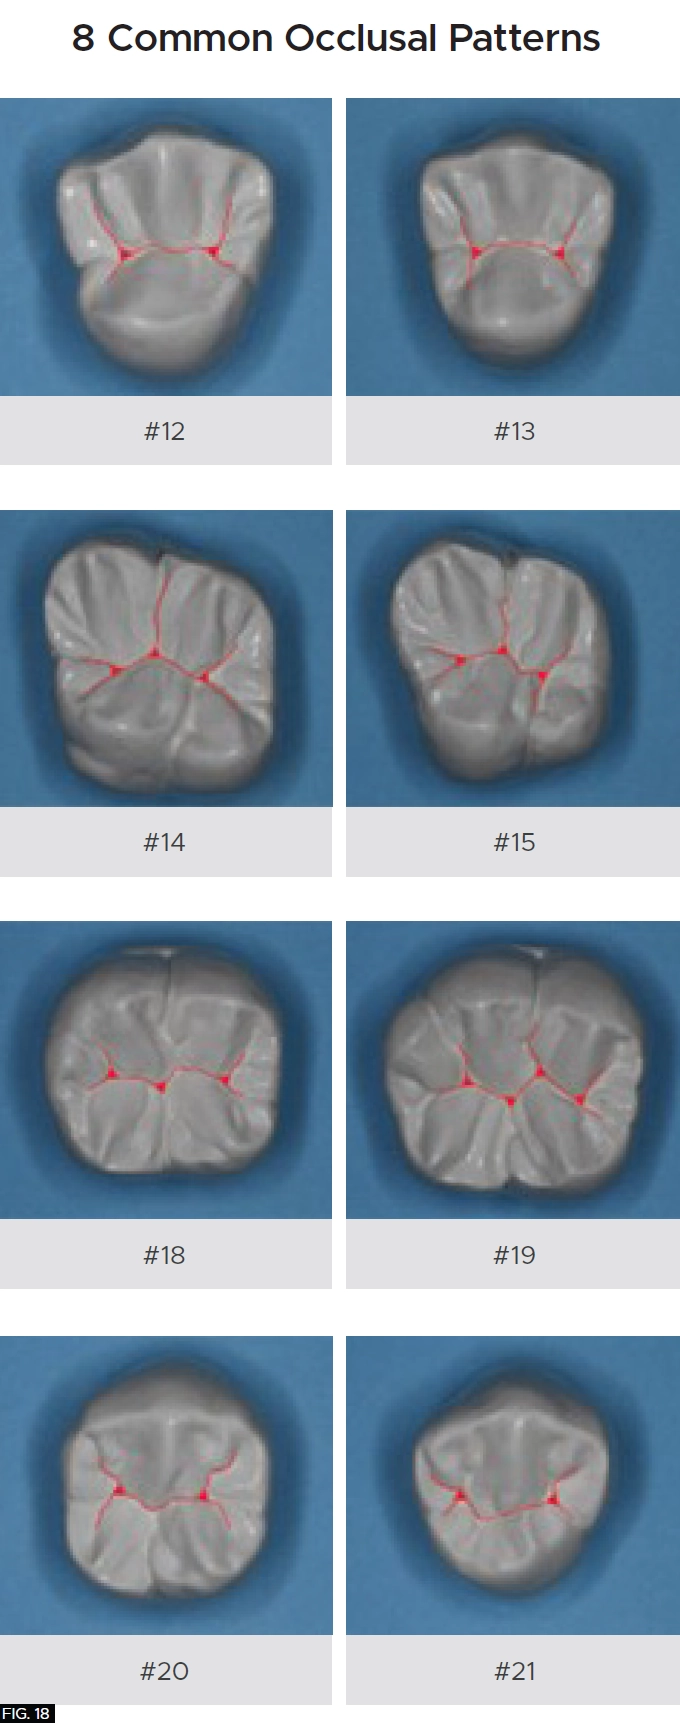
As with any dental restoration, it is paramount that if it is to function properly and to be undetectable, the natural tooth morphology must be adhered to. There are essentially 8 common occlusal anatomy guidelines in posterior human tooth shape. (Refer to Figure 18 on the bottom of the page) This is only a guideline as variations in human occlusal tooth anatomy can be expected in nature. For this patient, using anatomical guidelines, tooth #28 (#44) occlusal theme is depicted in Fig 11.
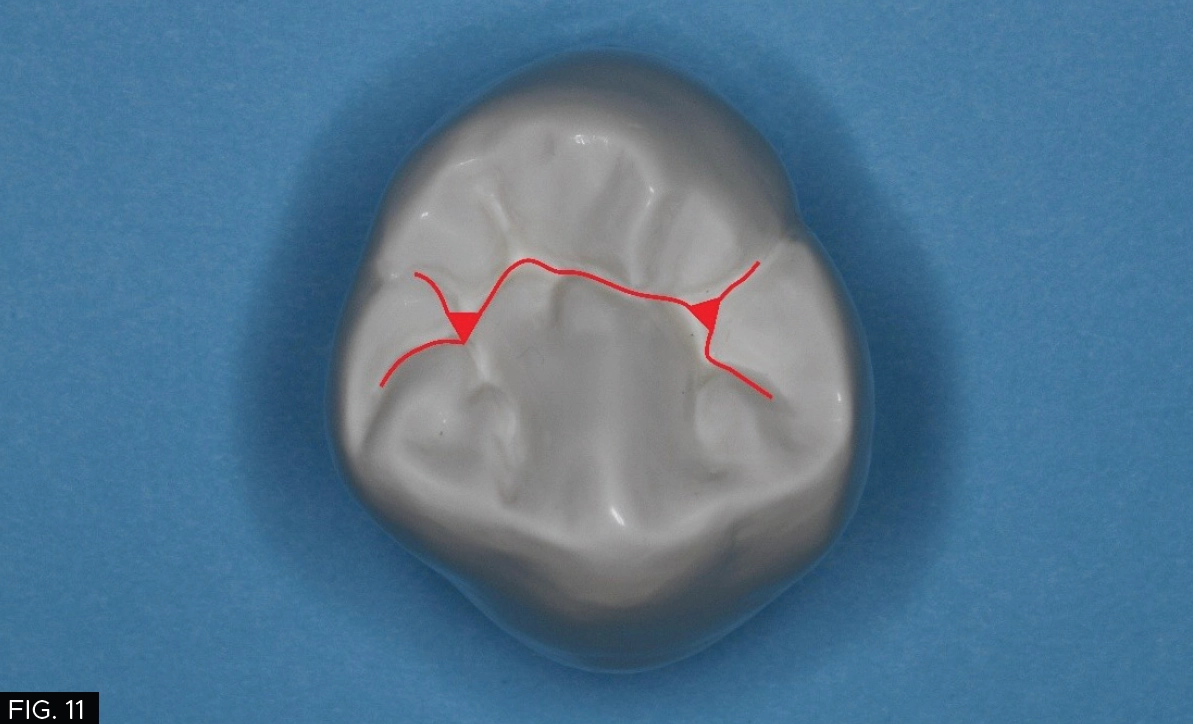
Using anatomical guidelines, tooth #28 (#44) occlusal theme is depicted.
However, a cross section of the occlusal theme of tooth #28 (#44) commonly has two planes connecting both buccal/lingual cusp tips into the central groove and both mesial/distal fossae as indicated with the red and yellow lines which must be taken into consideration. (FIG.12)
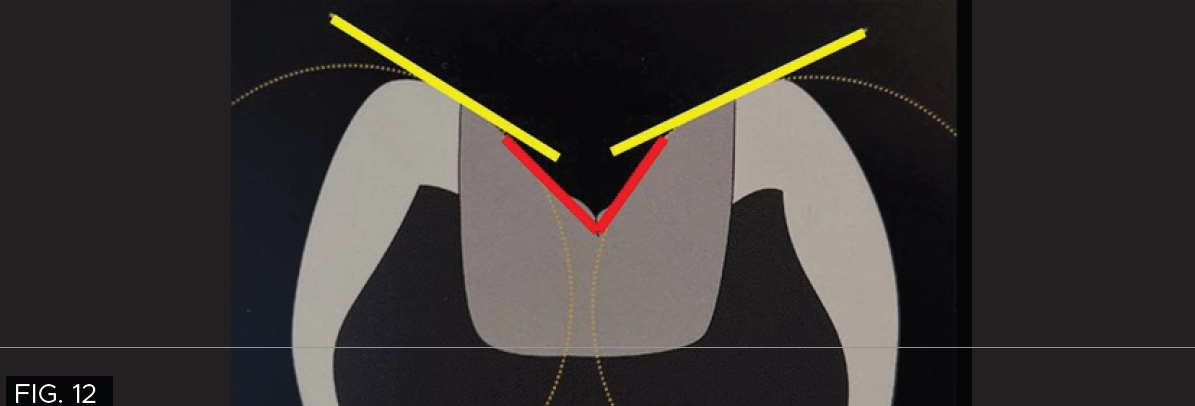
The red and yellow lines highlight the two-plane occlusal form of tooth #28 (#44), connecting the buccal and lingual cusp tips to the central groove and mesial/distal fossae.
The proper occlusal anatomy of any posterior tooth can be created with a simple flame shaped fine diamond bur (Komet® FG8888) which will allow you to carve the two planes that make up the triangular ridges while following the occlusal pattern of a particular posterior tooth as seen with this patient. (FIG.13) The tip of the bur is used to develop the fossa and steeper planes (red) and the remaining tooth structure will guide your less steep plane (yellow) development.
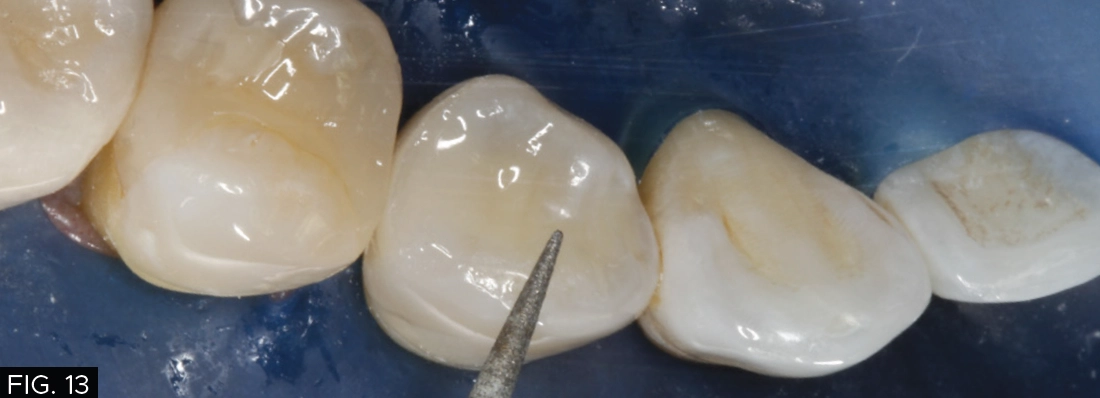
To smooth the occlusal anatomy a flame shaped fine diamond bur was used.
In order to smooth the occlusal anatomy that was created with the flame shape diamond bur and provide a high gloss finish on the composite resin, a set of A.S.A.P.® Diamond Polishing Brushes (Clinician’s Choice) with 45-micron and 6-micron diamond particles respectively were applied over the composite restoration for 10-20 seconds per brush. (FIG.14)
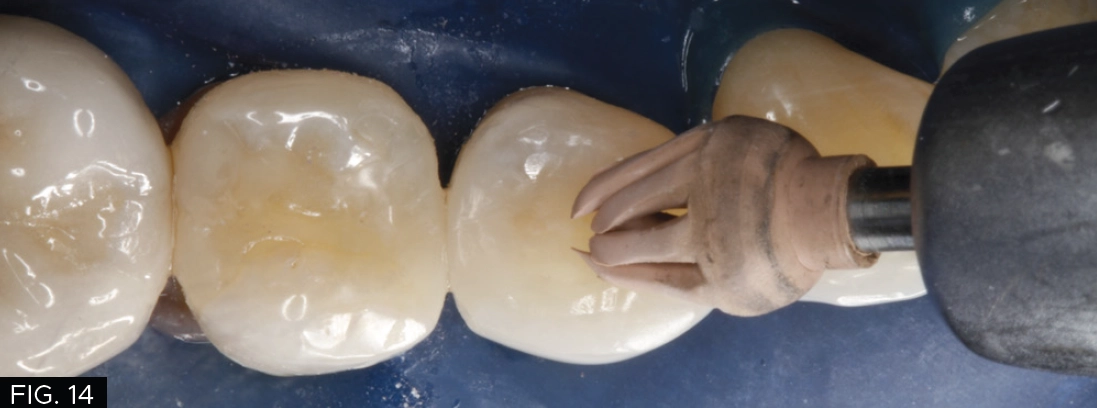
A set of A.S.A.P. Diamond Polishing Brushes are used to get into the deepest anatomical areas to provide a high gloss finish.
An A.S.A.P. Diamond Polishing Brush (Clinician’s Choice) can be used to reach the deepest anatomical areas.
The final polishing touch, to give the composite a shine that rivals that of porcelain restorations, can be accomplished by using a small amount of Enamelize™ aluminum oxide polishing paste (Cosmedent) with a Final Shine Cotton Polishing Wheel (Clinician’s Choice), as shown in FIG.15.
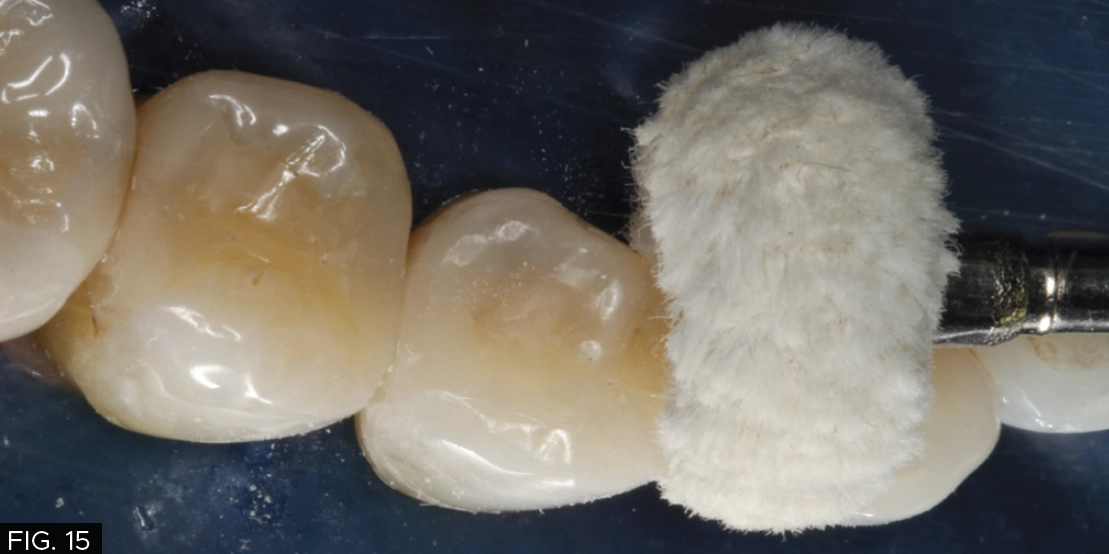
Enamelize aluminum oxide polishing paste along with a Final Shine Cotton Polishing Wheel are used to create the final polish.
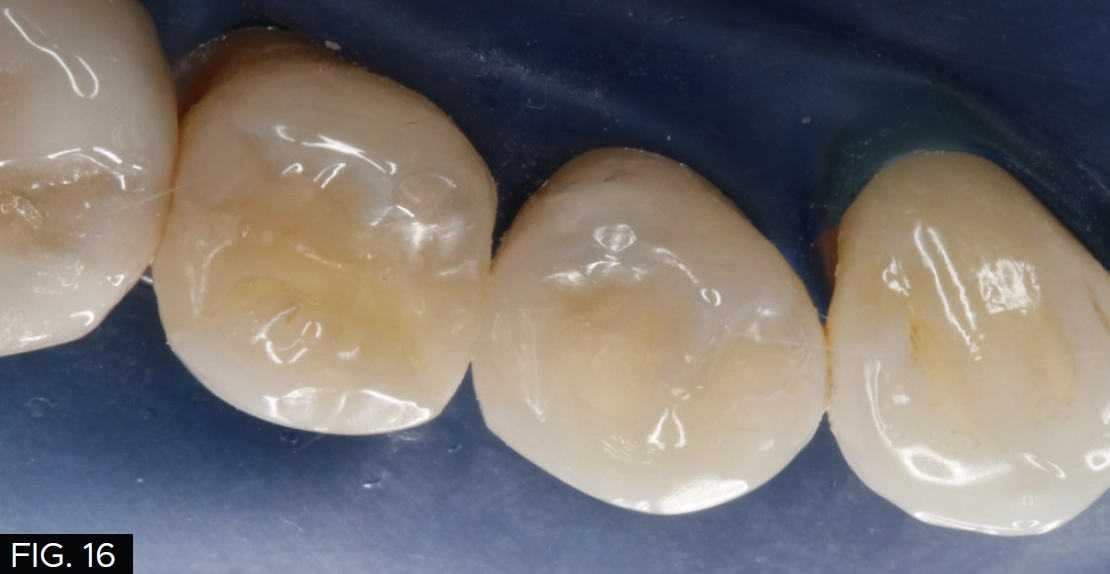
These simple steps demonstrate that once the occlusal pattern and morphology has been created, the restoration can be refined very quickly to obtain the smoothness and luster of natural tooth structure, that it is visibly undetectable to the eye even at the magnification of these photos (FIG. 16, 17). The key to Evanesce Bulk Cure seamlessly blending into the remaining tooth structure lies in the fact this composite has an opacity similar to natural tooth structure. The dual-cure chemistry ensures complete polymerization, in contrast to light-cure composites which require a layered placement technique because the material opacity and cavity depth can limit polymerization.
CONCLUSION
Predictable, highly esthetic composite dentistry is consistently achievable if there is a commitment to following an established workflow. Clinical stress can be significantly reduced or eliminated when an excellent restorative outcome can be anticipated every single time while the advantages of minimally invasive esthetic dentistry are possible without compromising a long-term result. More patients are looking for this option and looking for dentists who offer this type of service. This young patient was very pleased with the outcome that immediately addressed her initial concern of temperature and sweet sensitivity along with a restoration that will function for many years.

Final restoration of tooth #28 (#44). Note the seamless blending into the remaining tooth structure and the final luster that has been achieved.
REFERENCES
1. Juliana Jobim Jardim, Heliana Dantas Mestrinho, Bárbara Koppe, Lilian Marly de Paula, Luana Severo Alves, Paulo Márcio Yamaguti, Júlio César Franco Almeida, Marisa Maltz, Restorations after selective caries removal: 5-Year randomized trial, Journal of Dentistry, Volume 99, 2020, 103416, ISSN 0300-5712, https://doi.org/10.1016/j.jdent.2020.103416.
(https://www.sciencedirect.com/science/article/pii/S0300571220301627)

ABOUT THE AUTHOR
David Chan earned his DMD degree in 1989 from Oregon Health Sciences University. He maintains a full-time practice focused on cosmetic and comprehensive dentistry located in Ridgefield, Washington. Dr. Chan is the Past President of the American Academy of Cosmetic Dentistry, director at the Center for Dental Artistry and a Clinical Instructor at the Kois Center in Seattle, Washington. He is an Accredited member of the AACD and has been published widely in peer reviewed dental articles, including several articles in the prestigious “Journal of Cosmetic Dentistry.” In addition, Dr. Chan travels nationally/internationally giving lectures to dentists on comprehensive esthetic dental care and serves as a key opinion leader for many dental products companies.
Share This Article! Choose Your Platform
Products Mentioned in this article


Related Articles
Controlling the Variables for Perfect Class II Restorations
By David K. Chan, DMD, AAACD
Posterior dental composite restorations have become a cornerstone of modern restorative dentistry, combining esthetics, function, and conservation of tooth structure. One of the most critical aspects of achieving a successful posterior composite restoration is the ease of placing a long-lasting sensitivity-free restoration and accurately reproducing the occlusal anatomy for proper function with minimal adjustments.
Achieving Clinical Success Utilizing the DualForce™ Sectional Matrix System
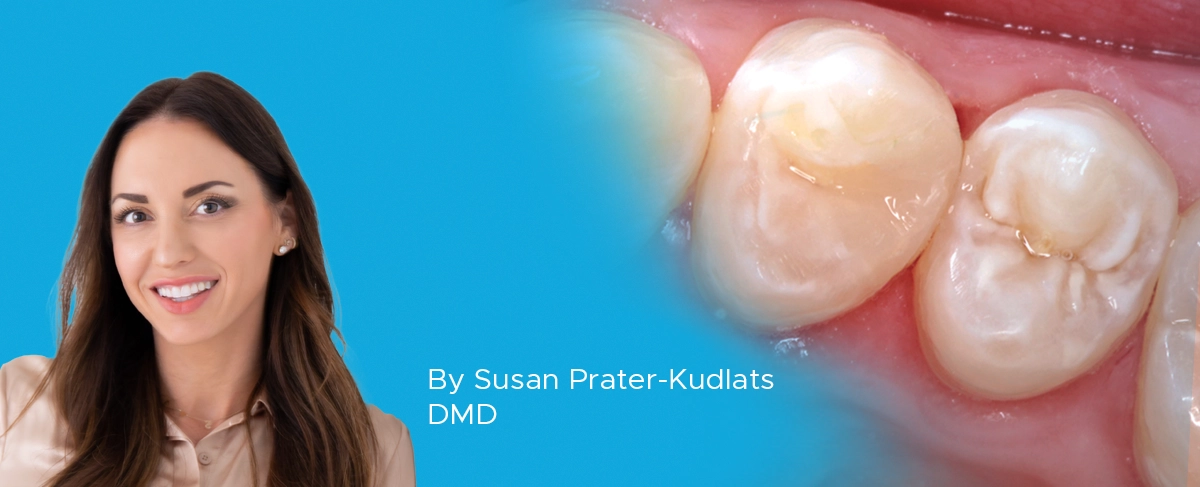
By Susan Prater-Kudlats, DMD
Although Class II restorations are routine amongst restorative dentists, they still present challenges when it comes to proper contour isolation, and marginal seal. Failure to achieve adequate contour can lead to food packing, gingival inflammation, and bone loss over time. The inability to ensure isolation can result in post-operative sensitivity; the marginal seal is essential to prevent recurrent decay.

Creating Beautiful Anterior Composite Restorations
By David Chan, DMD, AAACD
I believe there are two important concepts that should be embraced when considering direct restorative materials for anterior restorations: 1. Composite restorations can be indistinguishable from natural dentition and 2. Composite materials aren’t an inferior option to porcelain.
The Back-to-Back Class II Composite: A Predictable Workflow for One of the Most Common Clinical Procedures
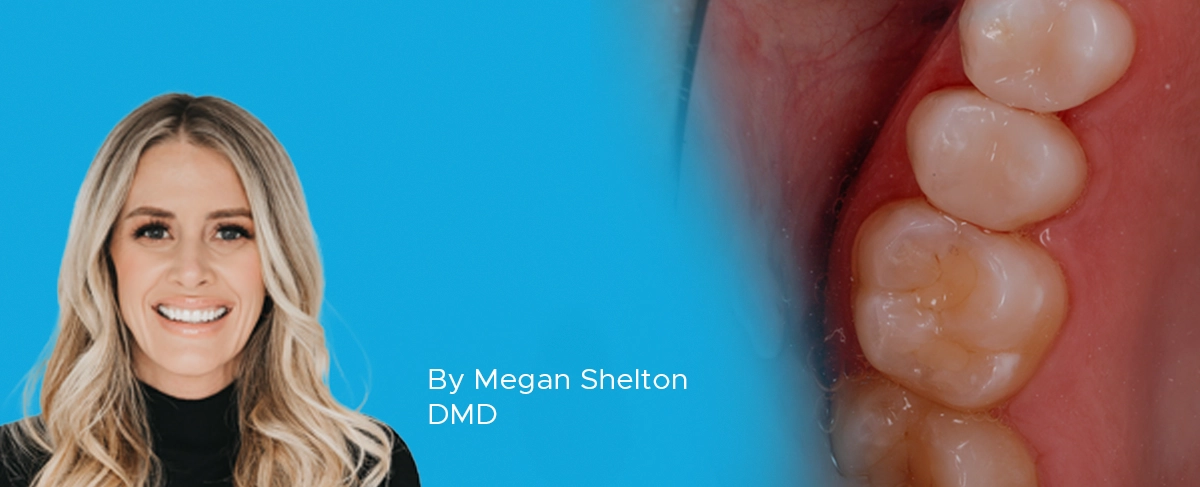
By Megan Shelton, DMD
While it may be one of the most common procedures in most restorative dental offices, the efficient placement of multiple Class II composites in a single quadrant can be technically demanding. Creating strong and natural proximal contours and contacts with the restoration of even a single Class II composite restoration can pose a challenge using traditional matrix systems.

Take 5: 5 Restorative Clinicians’ Take On Evanesce Nano-Enhanced Universal Restorative
5 Restorative Clinicians' Take On Evanesce Nano-Enhanced Universal Restorative.

Celebrating 10 Years of Clinical Excellence with David Chan, DMD, AAACD
Dr. David Chan graduated from the Oregon Health Science University in 1989 and has dedicated his professional life to creating composite restorations as much as an artist as a clinician.